Which api gateway is best for microservices java spring boot
Which api gateway is best for microservices java spring boot

I'd be happy to help!
Choosing the right API Gateway for your Microservices-based Java Spring Boot application can be a crucial decision. Here are some popular options, each with its strengths and weaknesses:
Amazon API Gateway: As part of AWS's suite of services, Amazon API Gateway is a popular choice for microservices architecture. It provides features like API key management, CORS support, and integration with AWS Lambda functions. Additionally, it supports multiple programming languages, including Java.Pros: Scalable, secure, integrates well with AWS services.
Cons: Limited customization options, may not be suitable for non-AWS environments.
** NGINX**: NGINX is a popular open-source API Gateway that can handle HTTP/HTTPS traffic and provides features like load balancing, caching, and SSL termination. It also supports Java-based applications through its Jetty module.Pros: Highly customizable, scalable, and widely adopted.
Cons: May require additional configuration for microservices-specific requirements.
Kong: Kong is an open-source API Gateway that's designed specifically for microservices architecture. It provides features like rate limiting, request transformation, and integrations with various services (including AWS Lambda).Pros: Highly customizable, supports multiple programming languages, and has a strong focus on microservices.
Cons: May require additional configuration for complex use cases.
Apache APISIX: Apache APISIX is an open-source API Gateway that's designed to provide a simple, yet powerful way to manage APIs in modern architectures (like microservices). It provides features like rate limiting, request transformation, and integrations with various services (including AWS Lambda).Pros: Highly customizable, supports multiple programming languages, and has a strong focus on simplicity.
Cons: May require additional configuration for complex use cases.
Tyk: Tyk is an open-source API Gateway that's designed specifically for microservices architecture. It provides features like rate limiting, request transformation, and integrations with various services (including AWS Lambda).Pros: Highly customizable, supports multiple programming languages, and has a strong focus on simplicity.
Cons: May require additional configuration for complex use cases.
In conclusion, each API Gateway has its strengths and weaknesses, making it essential to consider your specific requirements before making a decision. If you're already invested in the AWS ecosystem, Amazon API Gateway might be a good choice. If you prefer open-source solutions with high customizability, Kong or APISIX could be suitable options.
As for Java Spring Boot specifically, all of these API Gateways have some level of support for Java-based applications. However, if I had to choose one that's particularly well-suited for Java Spring Boot, I'd recommend NGINX due to its widespread adoption and strong support for Java-based applications through its Jetty module.
Remember, it's essential to evaluate each option based on your specific requirements and constraints before making a decision.
Hope this helps!
How to implement gateway in java using spring boot
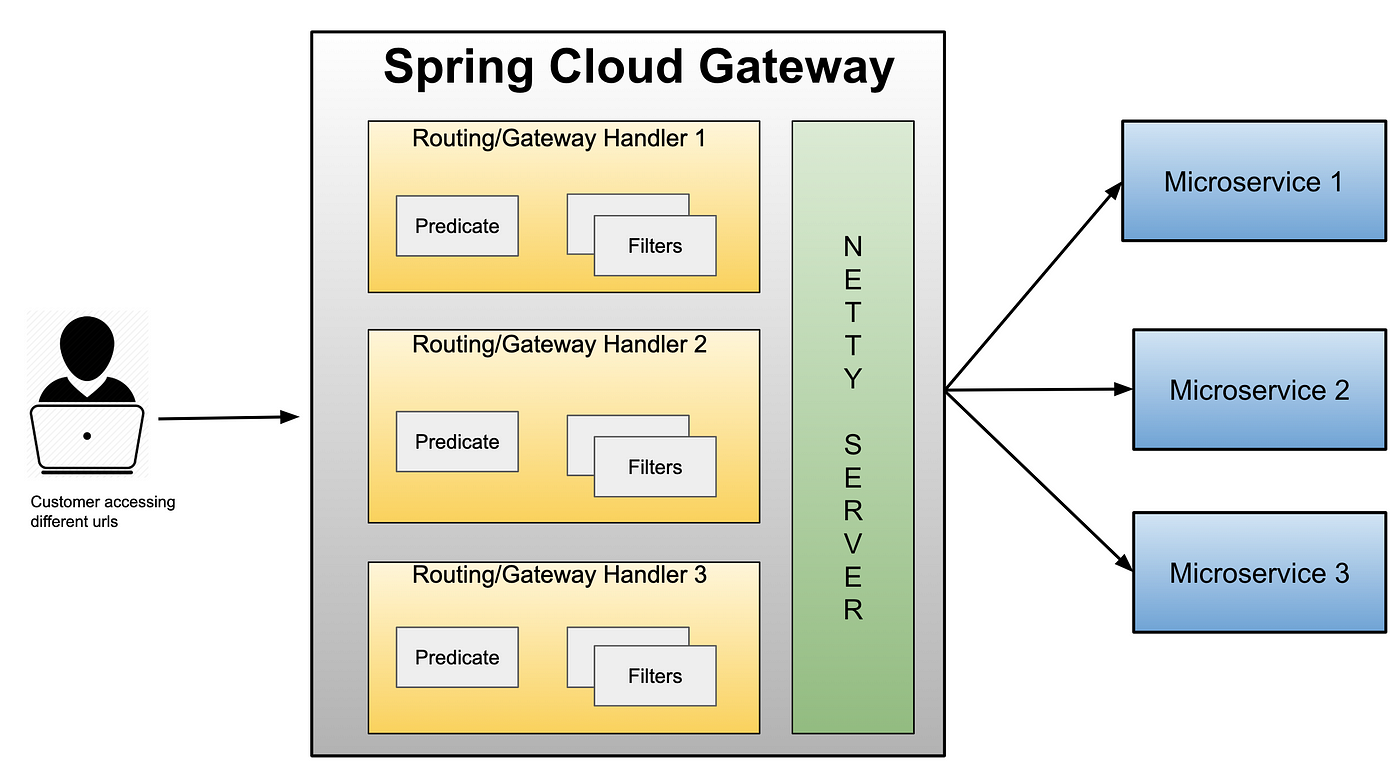
Implementing a Gateway with Java and Spring Boot!
What is a Gateway?
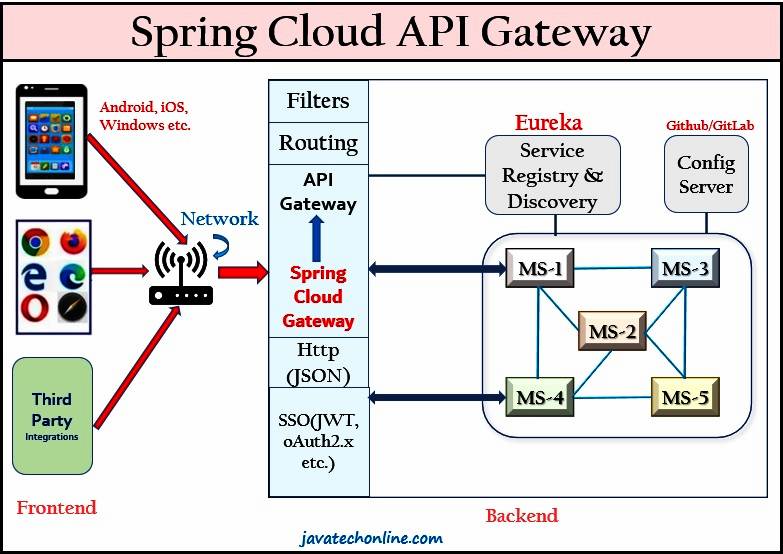
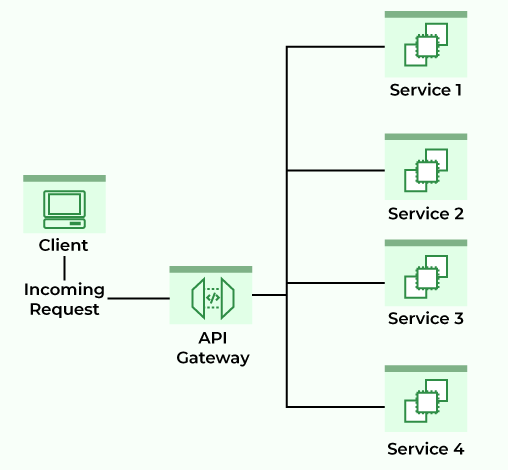
A Gateway serves as an entry point for incoming requests, acting as a mediator between clients (e.g., web browsers, mobile apps) and backend services. Its primary function is to route requests to the appropriate service or application while handling various aspects such as security, caching, logging, and more.
Why Use a Gateway with Spring Boot?
Spring Boot simplifies the process of creating a Gateway by providing an extensive set of features out-of-the-box. With Spring Boot, you can quickly build a robust gateway that handles multiple responsibilities, such as:
Routing: Direct incoming requests to specific microservices or applications. Security: Implement authentication, authorization, and rate limiting to control access. Caching: Store frequently accessed data to reduce the load on backend services. Error Handling: Handle errors gracefully by logging, retrying, or redirecting requests.Step-by-Step Guide to Implementing a Gateway with Spring Boot:
Create a new Spring Boot project:Using your preferred IDE (Eclipse, IntelliJ IDEA, etc.), create a new Spring Boot project. You can choose the "Web" dependency to include the necessary libraries.
In your pom.xml file (if using Maven) or build.gradle file (if using Gradle), add the following dependencies:
camel-core and camel-spring-boot-starter For OAuth 2.0: spring-security-oauth2 Configure routing:
Create a configuration class that extends WebClient.Builder. Here, you'll define the routes for your gateway.
@Configuration
public class RoutingConfig {
@Bean
public WebClient webClient() {
return WebClient.builder()
.baseUrl("http://example.com") // Base URL for backend services
.build();
}
}
Create a configuration class that extends SecurityConfigurerAdapter. Here, you'll define the security settings for your gateway.
@Configuration
public class SecurityConfig extends SecurityConfigurerAdapter<Oauth2SecurityBuilder, OAuth2SecurityExpressionInfo> {
@Override
public void init(SecurityBuilder sb) {
// Configure OAuth 2.0 authentication
}
}
Create a controller that will handle incoming requests and route them to the appropriate backend service.
@RestController
public class GatewayController {
@Autowired
private WebClient webClient;
@GetMapping("/api/service1")
public String getService1() {
// Route request to Service 1
return webClient.get().uri("/service1").retrieve().bodyToString();
}
}
Run your Spring Boot application, and it will start serving incoming requests.
This is a basic example of how to implement a gateway with Java and Spring Boot. You can customize the routing, security, caching, and error handling to fit your specific needs.
Remember, this is just the beginning! You can explore more advanced features and configurations in Spring Boot's vast ecosystem of libraries and frameworks. Happy coding!