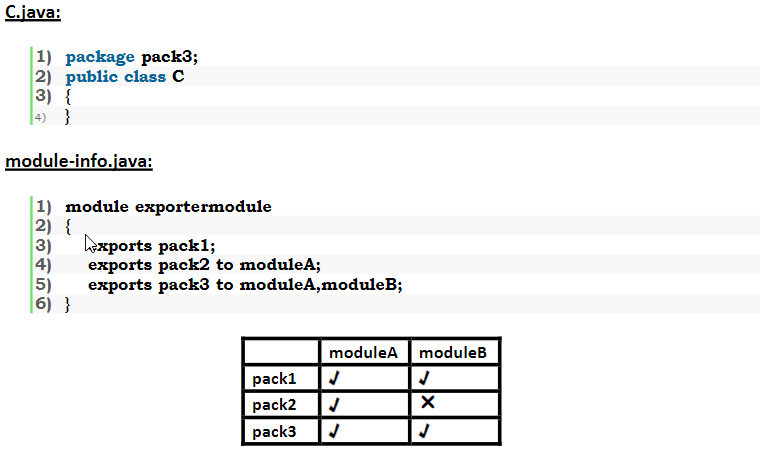
Temurin java 17 download
Temurin java 17 download

I'd be happy to help you with that!
Java is a popular programming language used for developing various applications, including Android apps, web applications, and enterprise software. If you're looking to download Java SE (Standard Edition) version 17, here's how you can do it:
Download from the Official Oracle Website:
Go to the official Oracle website at www.oracle.com.

Alternative Download Sources:
OpenJDK: OpenJDK is an open-source implementation of the Java Platform, and it also offers Java SE version 17 for download. You can visit their website at openjdk.org and follow the same steps as above. Unofficial Mirror Sites: There are several unofficial mirror sites that host Oracle's Java software, including Java SE version 17. Some popular ones include Softonic, FileHippo, and OldVersion. However, please note that these sites may not be officially sanctioned by Oracle, and you should exercise caution when downloading from them.Installation Instructions:
Once the download is complete, run the installation package (it's usually an executable file with a.exe or .dmg extension). Follow the installation wizard to install Java SE version 17 on your system. During the installation process, you may be prompted to choose the installation location and whether you want to create a desktop shortcut or not.
Important Notes:
Before installing any software, make sure to read and understand the licensing terms and conditions. Be cautious when downloading from unofficial sources, as they might contain malware or other security threats. Java SE version 17 is a relatively recent release, so ensure that you're running it on a compatible system (e.g., Windows 10, macOS High Sierra or later, or Linux distributions with a compatible kernel). After installation, you can verify the version of Java installed on your system by runningjava -version in your command prompt or terminal.
That's it! If you have any further questions or concerns about downloading and installing Java SE version 17, feel free to ask.
Temurin java 17 eclipse

I'd be happy to help you with your Java 17 Eclipse setup! Here's a comprehensive guide to get you started:
Step 1: Install Eclipse
To start, you'll need to download and install Eclipse from the official website (https://www.eclipse.org/downloads/). For this tutorial, we will be using the Eclipse IDE for Java Developers (64-bit).
Step 2: Set up your workspace
Once installed, launch Eclipse and follow these steps:
Click on "Welcome" in the top right corner of the screen to start a new workspace. Name your project (e.g., Temurin) and choose a directory to save it. Select the language (Java) and click "Next." Choose a location for your Eclipse workspace (e.g.,C:EclipseWorkspacesTemurin).
Step 3: Install Java 17
To set up Java 17, you'll need to download and install it from Oracle's official website (https://www.oracle.com/java/technologies/javase/jdk17-archive.html):
Download the JDK installer for your operating system. Run the installer and follow the installation prompts.Step 4: Configure Eclipse for Java 17
Once installed, configure Eclipse to use Java 17:
In Eclipse, go to "Window" > "Preferences" (or pressCtrl+Shift+P on Windows/Linux or Cmd+Shift+P on Mac). In the Preferences window, navigate to "Java" > "Compiler". Make sure the selected JRE is pointing to your newly installed Java 17 JDK. Update the Compiler compliance level to 17 (or the desired version).
Step 5: Verify Java 17 installation
To test whether Eclipse is using Java 17, create a new Java project:
Go to "File" > "New" > "Java Project". Name your project (e.g., TemurinTest). In the "Project Facets" section, select the "Java" facet and click "Finish." Create a simple Java class (e.g.,HelloWorld.java) in the new project:
public class HelloWorld {
public static void main(String[] args) {
System.out.println("Hello, World!");
}
}
Step 6: Run your Java program
To run your Java program using Java 17:
Right-click onHelloWorld.java and select "Run As" > "Java Application." Eclipse should now use Java 17 to compile and run the program.
That's it! With these steps, you've successfully set up Eclipse with Java 17. You can now start developing your projects using the latest features of Java 17.