Create Java project in Eclipse
Create Java project in Eclipse
I'd be happy to help you with that! Here's a step-by-step guide on how to create a Java project in Eclipse:
Step 1: Download and Install Eclipse
First, download the latest version of Eclipse from the official website: https://www.eclipse.org/. For this example, I'll use Eclipse Oxygen (4.7).
Once downloaded, run the installer and follow the prompts to install Eclipse.
Step 2: Create a New Java Project in Eclipse
Launch Eclipse and click on "File" > "New" > "Java Project". In the "New Java Project" wizard, enter a project name (e.g., "MyFirstJavaProject"), choose the "Java" project type, and select the JDK version you want to use (in this case, I'll use JRE 1.8). Click "Next" and then "Finish" to create the project.Step 3: Create a New Java Class
In the Eclipse Project Explorer, right-click on your new project and select "New" > "Class". Enter a name for your class (e.g., "HelloWorld") and choose the "Java" language. Click "Finish" to create the class.Here's what you'll see:
package com.example.mymainpackage;
public class HelloWorld {
public static void main(String[] args) {
// Add code here
}
}
Step 4: Write Your Java Code
Now it's time to write some Java code! Let's say we want to print "Hello, World!" to the console. We can add the following code inside the main method:
public class HelloWorld {
public static void main(String[] args) {
System.out.println("Hello, World!");
}
}
Step 5: Run Your Java Program
To run your program, right-click on your project in the Eclipse Project Explorer and select "Run As" > "Java Application". Eclipse will compile and execute your code.That's it! You've successfully created a new Java project in Eclipse and written your first Java program.
Here's the entire code:
package com.example.mymainpackage;
public class HelloWorld {
public static void main(String[] args) {
System.out.println("Hello, World!");
}
}
Additional Tips
Make sure to create a new package for your project. This helps organize your code and makes it easier to manage. Use the Eclipse compiler (ECJ) by default. To do this, go to "Window" > "Preferences" > "Java" > "Compiler", and select "Use ECJ as the Java compiler". Take advantage of Eclipse's built-in debugging features, such as breakpoints, step-through execution, and variable inspection.I hope this helps! Let me know if you have any questions or need further assistance.
How to create a java class in eclipse using eclipse
To create a Java class in Eclipse, you can follow these steps:
Step 1: Open the Eclipse IDE
First, open your Eclipse Integrated Development Environment (IDE). If you don't have Eclipse installed on your computer, you can download it from the official Eclipse website.
Step 2: Create a new project
In Eclipse, go to File > New > Java Project. This will create a new project for your Java class. Give your project a name and location, and then click Next.
Step 3: Set up the project
In the next window, you can specify some additional settings for your project. You don't need to change anything here unless you have specific requirements. Click Finish to complete the project creation process.
Step 4: Create a new Java class
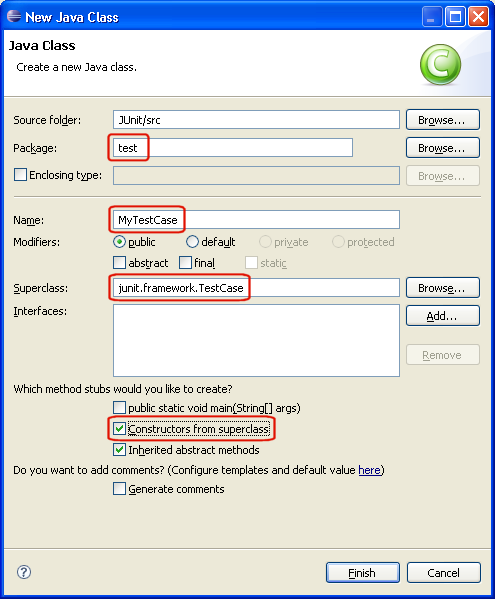
To create a new Java class, right-click on the project in the Project Explorer (usually located at the left side of the Eclipse window). Select New > Class from the context menu. This will open the "New Class" wizard.
Step 5: Specify the class details
In the "New Class" wizard, enter the following information:
Name: Give your Java class a name that describes its purpose or functionality. Package: You can leave this blank, as Eclipse will automatically generate a package name for you. Or, if you prefer to specify your own package name, enter it here. Superclass/Interface: Leave this blank unless you're creating a subclass of an existing Java class or implementing a specific interface.Step 6: Choose the source folder
In the "New Class" wizard, select the source folder where you want Eclipse to save your Java class file. By default, this is the "src" folder inside your project directory.
Step 7: Review and complete the creation process
Click Finish to create your new Java class. Eclipse will generate a basic Java class template for you, complete with methods for constructors and main().
That's it! You have now created a new Java class in Eclipse using the Eclipse IDE. From here, you can start writing your own Java code, using Eclipse's built-in features such as syntax highlighting, code completion, and debugging tools.
Here are some additional tips to get started:
To run your Java class, right-click on it in the Project Explorer and select Run As > Java Application. To debug your Java class, right-click on it in the Project Explorer and select Debug As > Java Application. Eclipse provides many built-in features to help you write better code, including syntax highlighting, code completion, and quick fixes for common errors. Take advantage of these tools to improve your coding productivity!Remember, creating a new Java class in Eclipse is just the first step in building your own Java applications. With Eclipse's powerful development tools and features, you can take your programming skills to the next level!
