What is Kubernetes in Java?
What is Kubernetes in Java?
I'd be happy to explain Kubernetes in Java!
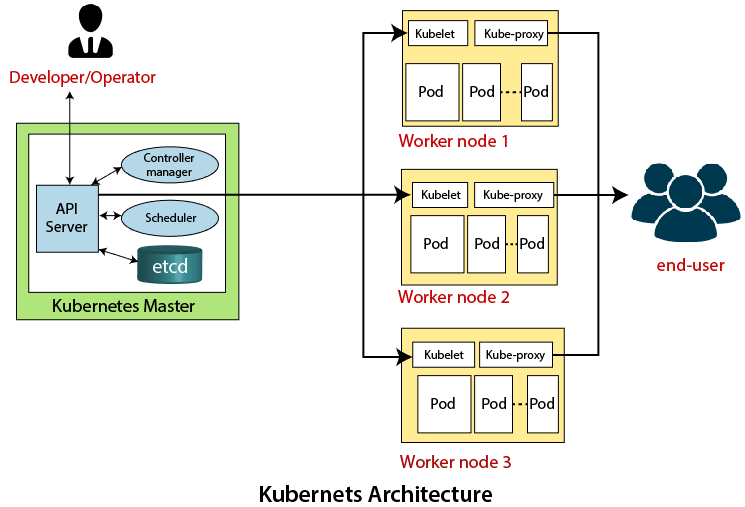
Kubernetes (also known as K8s) is an open-source container orchestration system that automates the deployment, scaling, and management of containers. Containers are lightweight and portable, allowing you to package your application code, libraries, and dependencies into a single unit. This makes it easier to manage and deploy applications across different environments, such as development, testing, staging, and production.
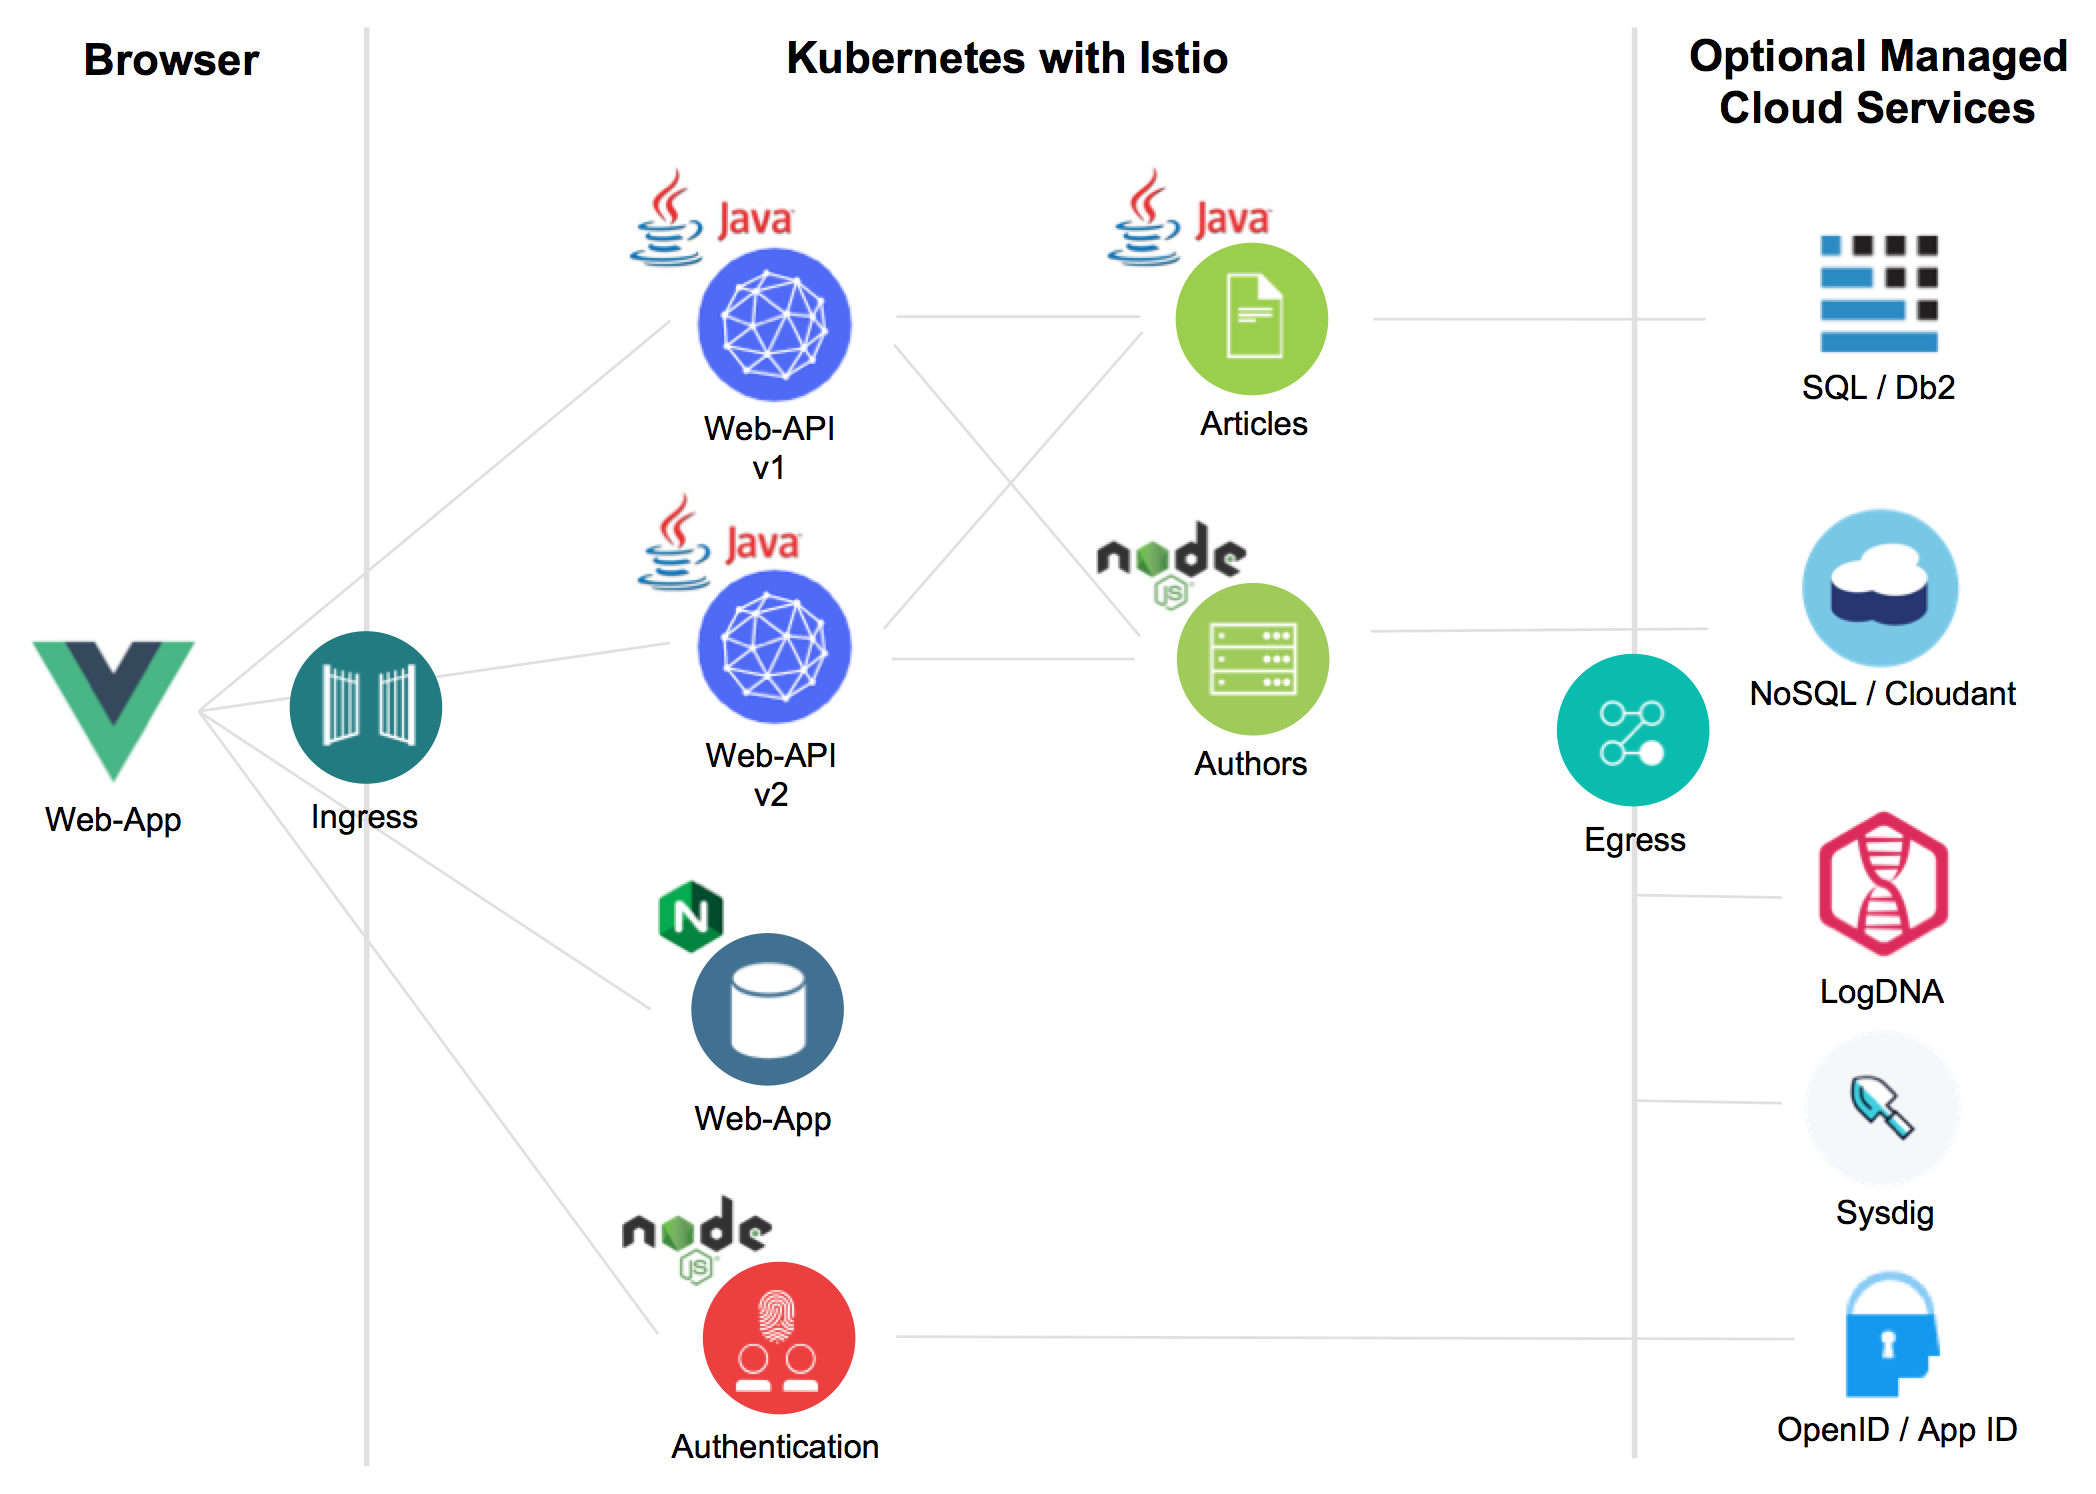
In Java, Kubernetes provides a way to manage and orchestrate containerized Java applications, such as Spring Boot or Jakarta EE-based projects. Here's how:
Containerization: You create a Docker image for your Java application, which includes the necessary dependencies and libraries. This ensures that your application is self-contained and can run consistently across different environments. Kubernetes Deployment: You define a Kubernetes Deployment YAML file that describes the containerized application, including its dependencies, resource requirements (e.g., CPU, memory), and scaling policies. The Deployment file also specifies the desired state of the application, such as the number of replicas or instances.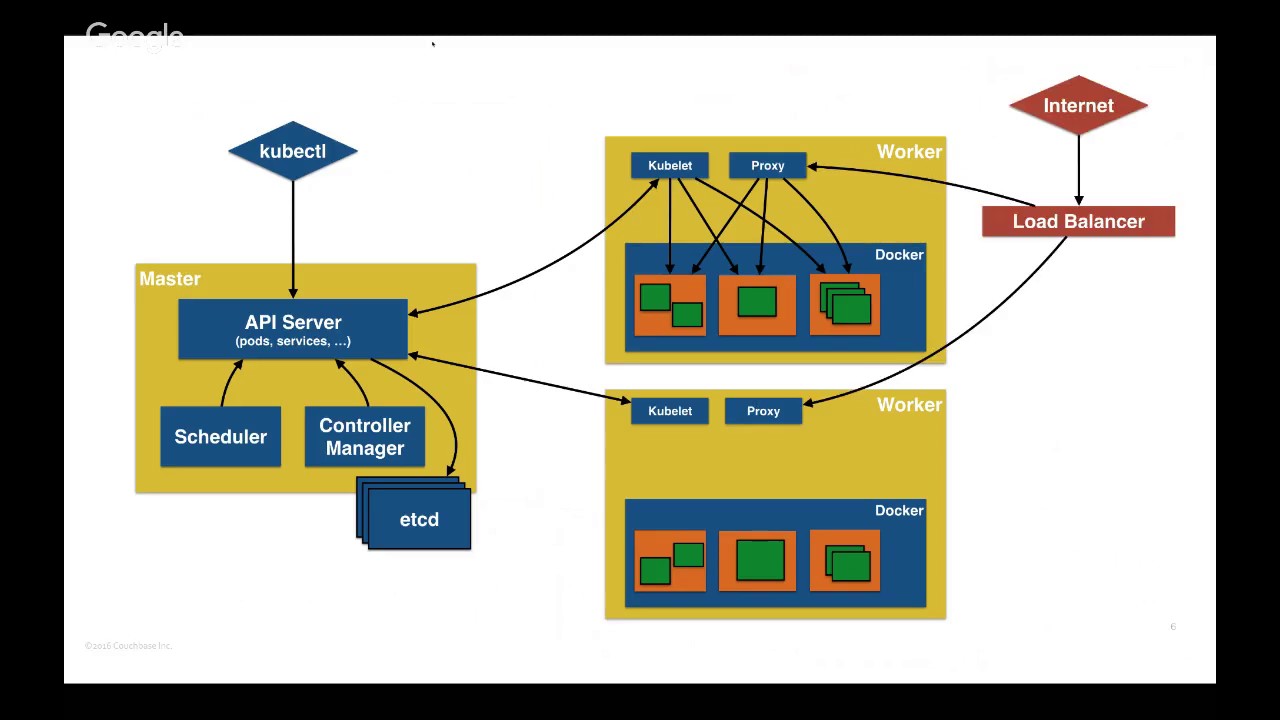
By using Kubernetes in Java, you benefit from:
Efficient scaling: Scale your Java application horizontally or vertically based on demand, without worrying about server resources. High availability: Ensure that your Java application is always available and running by specifying multiple replicas or instances. Rollbacks: Easily roll back to a previous version of your Java application in case something goes wrong. Logging and monitoring: Use Kubernetes' built-in logging and monitoring capabilities, such as Prometheus or Grafana, to keep an eye on your Java application's performance.To get started with Kubernetes in Java, you can use various tools and libraries, such as:
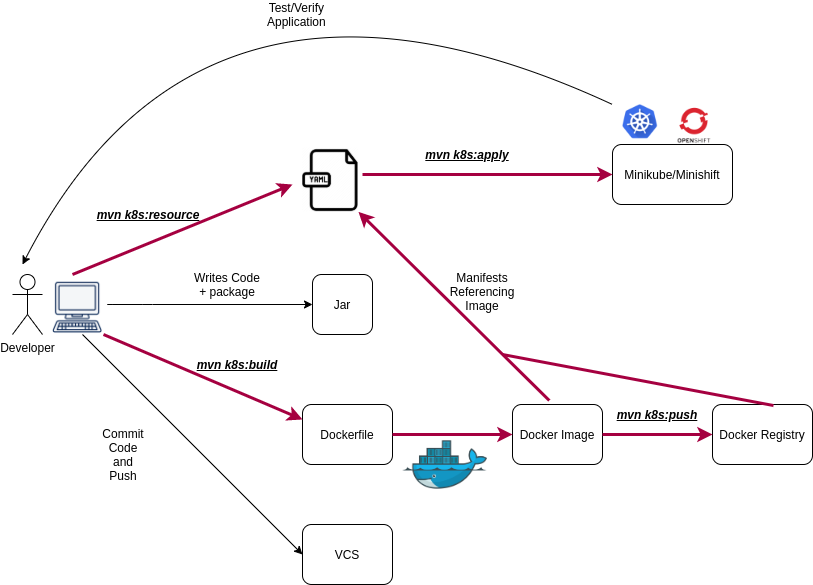
Maven plugin: Use the Maven Kubernetes plugin (k8s-maven-plugin) to integrate Kubernetes into your Java build process. Java client library: Leverage the official Kubernetes Java client library (io.kubernetes.client) to interact with your Kubernetes cluster from your Java application. Spring Boot Starter: Use the Spring Boot Starter for Kubernetes, which provides a simplified way to interact with Kubernetes and manage containerized Spring Boot applications.In summary, Kubernetes in Java enables you to create and manage containerized Java applications efficiently, scale them as needed, and ensure high availability while leveraging the benefits of cloud-native computing.
Java kubernetes tutorial
Here is a comprehensive Java and Kubernetes tutorial:
Introduction
Kubernetes (also known as K8s) is an open-source container orchestration system that automates the deployment, scaling, and management of containers. In this tutorial, we will explore how to use Java to develop applications that can be deployed on Kubernetes.
Prerequisites
Familiarity with Java programming language Basic knowledge of Docker and containerization Access to a Kubernetes cluster (you can create a free cluster on platforms like Google Cloud or AWS)
Step 1: Creating a Java Application
Create a new Java project using your preferred IDE (Eclipse, IntelliJ, etc.). Create a simple "Hello World" application that prints a message to the console. Here's an example code:
public class HelloWorld {
public static void main(String[] args) {
System.out.println("Hello, World!");
}
}
Step 2: Creating a Docker Image
Create a new directory for your Docker image and create a Dockerfile inside it. A Dockerfile is a text file that contains instructions on how to build a Docker image.
FROM openjdk:8-jdk-alpineVOLUME /tmp
COPY target/HelloWorld.jar /app/
CMD ["java", "-jar", "HelloWorld.jar"]
This Dockerfile uses the OpenJDK 8 base image, maps a volume to /tmp, copies your Java application JAR file to the /app directory, and sets the command to run your Java application.
Step 3: Building a Docker Image
Build your Docker image using the following command:
docker build -t my-java-app .
This command will create a new Docker image with the tag my-java-app.
Step 4: Creating a Kubernetes Deployment YAML File
Create a new directory for your Kubernetes deployment and create a deployment.yaml file inside it. Here's an example code:
apiVersion: apps/v1kind: Deployment
metadata:
name: my-java-app
spec:
replicas: 1
selector:
matchLabels:
app: my-java-app
template:
metadata:
labels:
app: my-java-app
spec:
containers:
name: my-java-appimage: my-java-app:latest
ports:
containerPort: 8080
This YAML file defines a new deployment named my-java-app with one replica, using the Docker image we built earlier.
Step 5: Applying the Kubernetes Deployment YAML File
Apply your Kubernetes deployment YAML file to your cluster using the following command:
kubectl apply -f deployment.yaml
This command will create a new deployment in your Kubernetes cluster.
Conclusion
In this tutorial, you learned how to create a simple Java application, build a Docker image for it, and deploy it on a Kubernetes cluster. You can now use Java and Kubernetes together to develop more complex applications that can be scaled and managed easily.
I hope this helps! Let me know if you have any questions or need further clarification.