How to deploy Java code to AWS?
How to deploy Java code to AWS?
Deploying Java code to Amazon Web Services (AWS) is a straightforward process that requires a few steps and some basic understanding of cloud computing concepts. Here's a step-by-step guide to help you get started:
Step 1: Create an AWS account
If you don't already have an AWS account, create one by going to the AWS website and following the sign-up process.
Step 2: Choose a Java runtime environment (JRE)
AWS provides several JREs that you can use to deploy your Java code. The most popular ones are:
Amazon Corretto: A open-source, production-ready distribution of OpenJDK, which is fully compatible with Java 8. Amazon SDK for Java: A set of libraries and tools that allows you to build, test, and deploy Java applications on AWS.Step 3: Prepare your Java code
Make sure your Java code is compiled and packaged as a JAR (Java Archive) file. You can use an Integrated Development Environment (IDE) like Eclipse or IntelliJ IDEA to compile and package your code.
Step 4: Create an AWS Lambda function
AWS Lambda is a serverless computing service that allows you to run your Java code without worrying about the underlying infrastructure. To create a Lambda function, follow these steps:
Log in to the AWS Management Console. Navigate to the Lambda dashboard. Click "Create function" and choose "Author from scratch". Select "Java" as the runtime and choose an existing JRE (such as Amazon Corretto) or create a new one. Upload your JAR file by clicking "Upload ZIP file" and selecting your packaged Java code. Set up the Lambda function configuration, such as the handler, memory size, and execution timeout.Step 5: Deploy your Java code to AWS
Once you've created a Lambda function, you can deploy your Java code by following these steps:
Go to the Lambda dashboard and select the function you created earlier. Click "Deploy" and choose "Update function code". Upload your JAR file again by clicking "Upload ZIP file" and selecting your packaged Java code.Step 6: Test your Java code on AWS
Test your Java code on AWS by sending test events to your Lambda function. You can use the AWS CLI or the Lambda console to test your function.
Step 7: Monitor and maintain your Java code on AWS
Monitor your Java code's performance and maintenance using AWS CloudWatch, a monitoring service that provides real-time data and insights about your application's performance. You can also use other AWS services like Amazon X-Ray for distributed tracing, and Amazon CloudTrail for auditing and logging.
Tips and considerations
Make sure your Java code is compatible with the chosen JRE. Use an IDE to compile and package your Java code. Choose the right instance type and configuration for your Lambda function based on its memory requirements and execution time. Use AWS CloudFormation or AWS CDK to deploy your Java code as part of a larger infrastructure stack.By following these steps, you can successfully deploy your Java code to AWS using Lambda. Remember to test and monitor your application's performance to ensure it meets your requirements.
How to run Java in vscode
I'd be happy to help you with that!
To run Java in VSCode, you'll need to follow these steps:
Step 1: Install the Java Extension Pack
The first thing you need to do is install the Java Extension Pack for VSCode. You can do this by opening the Extensions view by clicking on the Extensions icon (looks like a puzzle piece) in the left sidebar or typing "Extensions" in the Command Palette (Ctrl + Shift + P). Once the Extensions view opens, search for "Java Extension Pack" and click on the result to install it.
Step 2: Configure Your Java Project
Now that you have the Java Extension Pack installed, it's time to configure your Java project. To do this, create a new folder for your project (e.g., "MyJavaProject") and navigate into it using the Command Prompt or Terminal. Then, use the following commands to initialize a new Java project:
mkdir myjava
cd myjava
touch HelloWorld.java
These commands will create a new directory called "myjava" inside your project folder, navigate into that directory, and then create a new file called "HelloWorld.java".
Step 3: Write Your Java Code
Next, open the "HelloWorld.java" file using VSCode (you can do this by navigating to the file in the File Explorer or typing "file:///path/to/HelloWorld.java" in the Command Palette). Then, write your Java code:
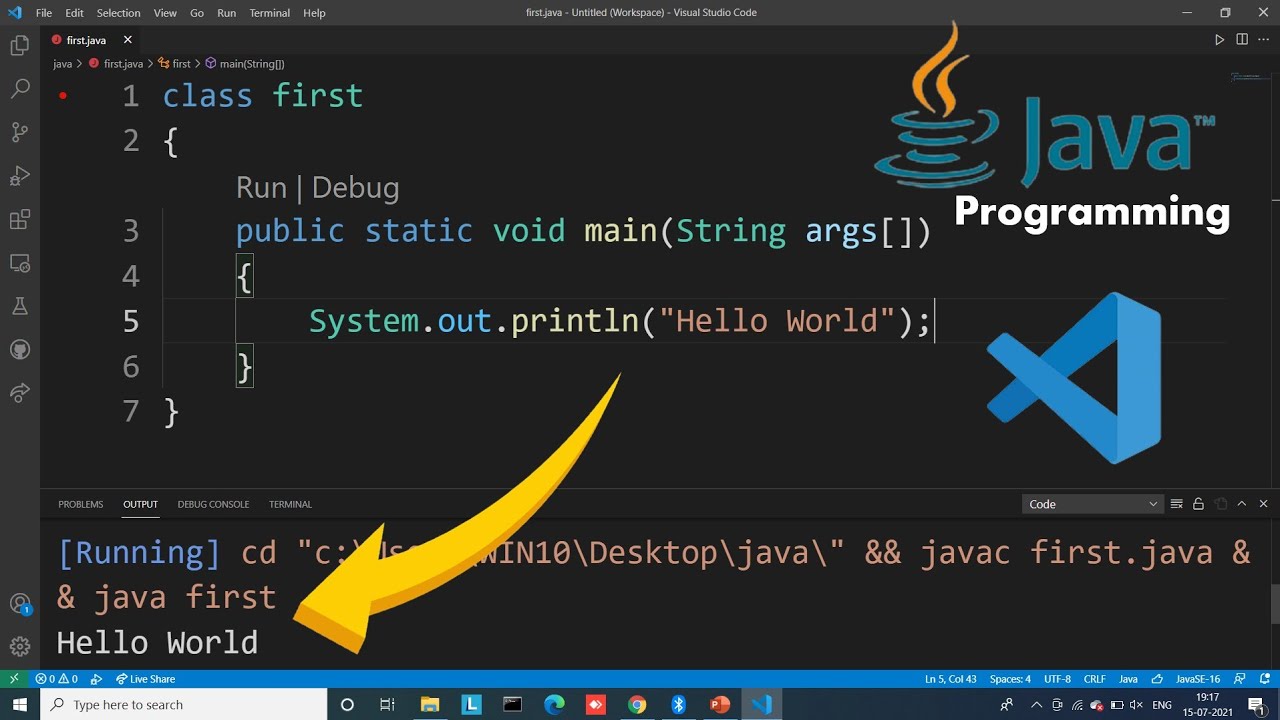
public class HelloWorld {
public static void main(String[] args) {
System.out.println("Hello, World!");
}
}
This is a simple "Hello, World!" program that prints out a greeting message when you run it.
Step 4: Run Your Java Code
To run your Java code in VSCode, open the Command Palette by pressing Ctrl + Shift + P (or use the keyboard shortcut of your choice). Then, type "Java: Run" and select the command from the dropdown list. This will compile and run your Java program.
When you run your program, you should see the message "Hello, World!" printed out in the terminal or Command Prompt. Congratulations! You have successfully written, compiled, and run a Java program in VSCode!
Additional Tips
To debug your Java code, open the Debug view by clicking on the Debug icon (looks like a bug) in the top toolbar or typing "Debug" in the Command Palette. Then, select the "HelloWorld" configuration from the dropdown list. To run your Java program using the command line, navigate to the directory containing your project and typejava HelloWorld to compile and run it.
That's it! With these steps, you should be able to write, compile, and run Java programs in VSCode. Happy coding!