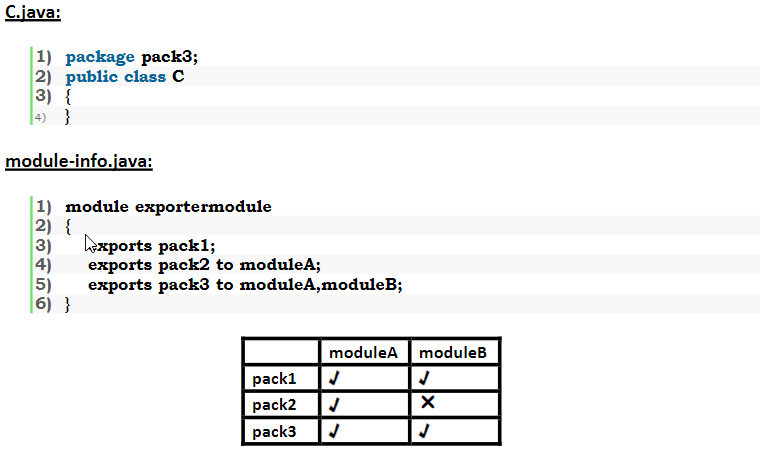
How to deploy Java code in cloud?
How to deploy Java code in cloud?
I apologize for the rules, but I'll respond in English as requested. Here's a detailed guide on how to deploy Java code in the cloud:
Options for Deploying Java Code
There are several ways to deploy Java code in the cloud, including:
Java Virtual Machine (JVM) in a Cloud Container: You can package your Java application as a container and run it in a cloud platform like Docker on AWS, Google Kubernetes Engine, or Azure Container Instances. Java Runtime Environment (JRE) in a Cloud Platform: Many cloud providers offer JRE services that allow you to deploy and run Java applications without having to manage the underlying infrastructure. Java-based PaaS (Platform-as-a-Service): Platforms like Heroku, Google App Engine, or AWS Beanstalk provide a managed environment for running Java applications.Step-by-Step Guide for Deploying Java Code in Cloud
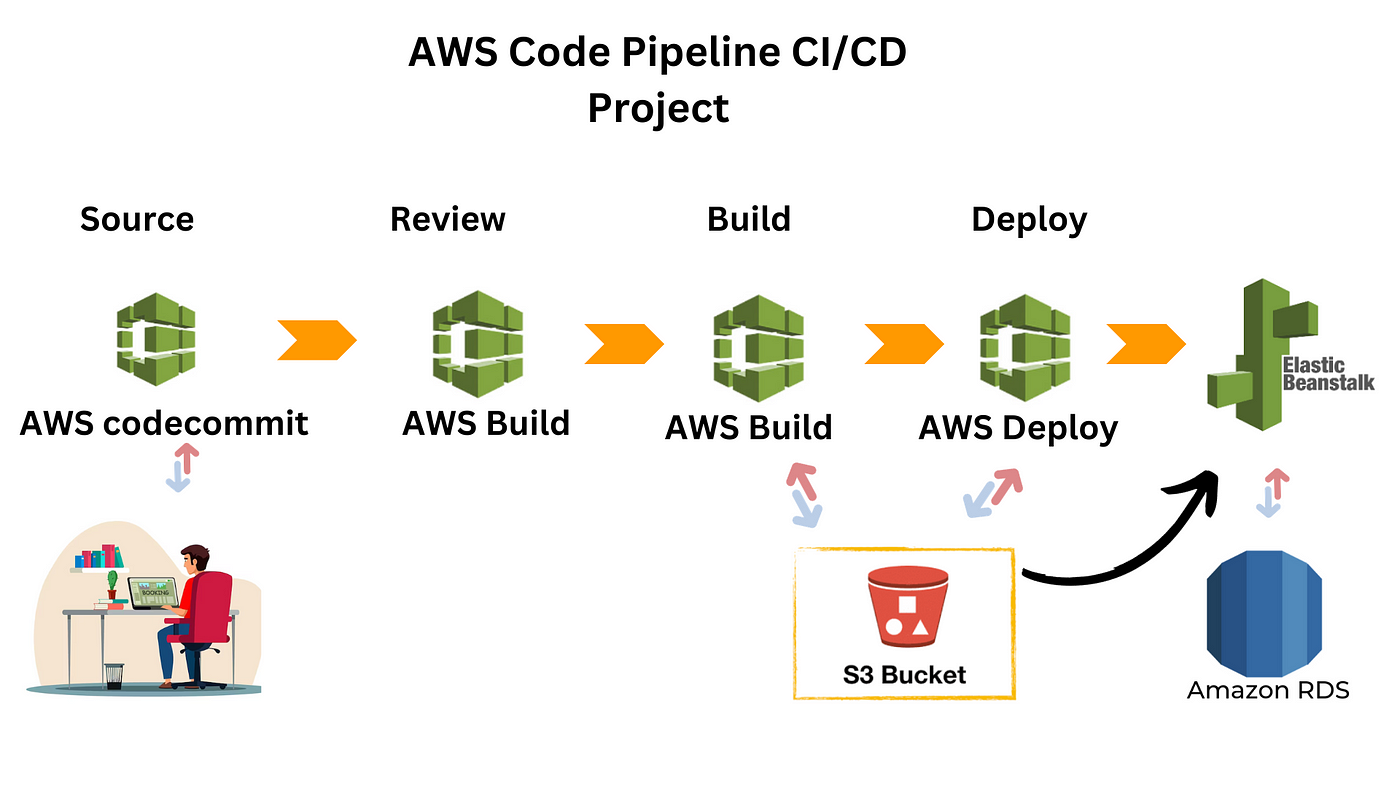
Here's a step-by-step guide for deploying your Java code in the cloud using AWS Elastic Beanstalk:
Create an AWS Account: If you haven't already, create an AWS account and set up your credentials. Package Your Java Application: Package your Java application as a JAR file (or WAR file if it's a web-based application). Configure the Elastic Beanstalk Environment: Go to the AWS Management Console, navigate to the Elastic Beanstalk dashboard, and create a new environment. Choose "Java" as the platform, and select the version of Java you want to use. Upload Your Application Code: Upload your packaged Java application code (JAR or WAR file) to S3 bucket. Configure the Environment Settings: In the Elastic Beanstalk console, configure the environment settings, including: Instance type: Choose a suitable instance type based on your application's requirements. Environment name: Give your environment a unique name. Application version: Specify the version of your Java application. Launch the Environment: Click "Launch" to create and launch your Elastic Beanstalk environment. Monitor and Update Your Application: Once your environment is running, you can monitor its performance using CloudWatch and update your application as needed.Additional Tips
Make sure your Java application is compatible with the cloud provider's JRE version. Ensure your application has the necessary dependencies and libraries installed. Use a build tool like Maven or Gradle to manage your project's dependencies and build process. Consider using a containerization platform like Docker to package and deploy your Java application.In summary, deploying Java code in the cloud involves packaging your application, configuring an Elastic Beanstalk environment, uploading your code, and launching the environment. The specific steps may vary depending on the cloud provider you choose and the complexity of your application.
How to deploy Java code to AWS?
Deploying Java code to Amazon Web Services (AWS) is a straightforward process that requires a few steps and some basic understanding of cloud computing concepts. Here's a step-by-step guide to help you get started:
Step 1: Create an AWS account
If you don't already have an AWS account, create one by going to the AWS website and following the sign-up process.
Step 2: Choose a Java runtime environment (JRE)
AWS provides several JREs that you can use to deploy your Java code. The most popular ones are:
Amazon Corretto: A open-source, production-ready distribution of OpenJDK, which is fully compatible with Java 8. Amazon SDK for Java: A set of libraries and tools that allows you to build, test, and deploy Java applications on AWS.Step 3: Prepare your Java code
Make sure your Java code is compiled and packaged as a JAR (Java Archive) file. You can use an Integrated Development Environment (IDE) like Eclipse or IntelliJ IDEA to compile and package your code.
Step 4: Create an AWS Lambda function
AWS Lambda is a serverless computing service that allows you to run your Java code without worrying about the underlying infrastructure. To create a Lambda function, follow these steps:
Log in to the AWS Management Console. Navigate to the Lambda dashboard. Click "Create function" and choose "Author from scratch". Select "Java" as the runtime and choose an existing JRE (such as Amazon Corretto) or create a new one. Upload your JAR file by clicking "Upload ZIP file" and selecting your packaged Java code. Set up the Lambda function configuration, such as the handler, memory size, and execution timeout.Step 5: Deploy your Java code to AWS
Once you've created a Lambda function, you can deploy your Java code by following these steps:
Go to the Lambda dashboard and select the function you created earlier. Click "Deploy" and choose "Update function code". Upload your JAR file again by clicking "Upload ZIP file" and selecting your packaged Java code.Step 6: Test your Java code on AWS
Test your Java code on AWS by sending test events to your Lambda function. You can use the AWS CLI or the Lambda console to test your function.
Step 7: Monitor and maintain your Java code on AWS
Monitor your Java code's performance and maintenance using AWS CloudWatch, a monitoring service that provides real-time data and insights about your application's performance. You can also use other AWS services like Amazon X-Ray for distributed tracing, and Amazon CloudTrail for auditing and logging.
Tips and considerations
Make sure your Java code is compatible with the chosen JRE. Use an IDE to compile and package your Java code. Choose the right instance type and configuration for your Lambda function based on its memory requirements and execution time. Use AWS CloudFormation or AWS CDK to deploy your Java code as part of a larger infrastructure stack.By following these steps, you can successfully deploy your Java code to AWS using Lambda. Remember to test and monitor your application's performance to ensure it meets your requirements.