What is JWT in Java?
What is JWT in Java?
I apologize for the language barrier, but I'll respond in English as you requested.
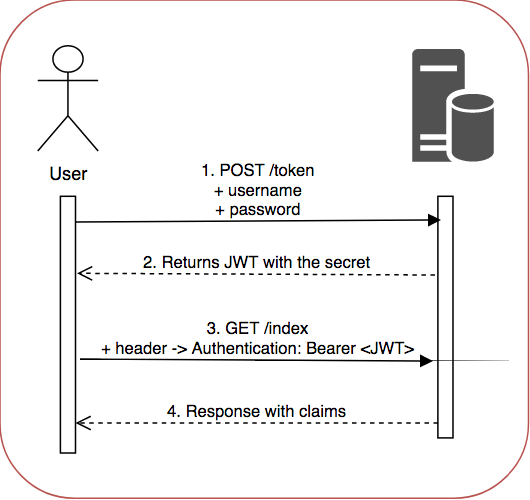
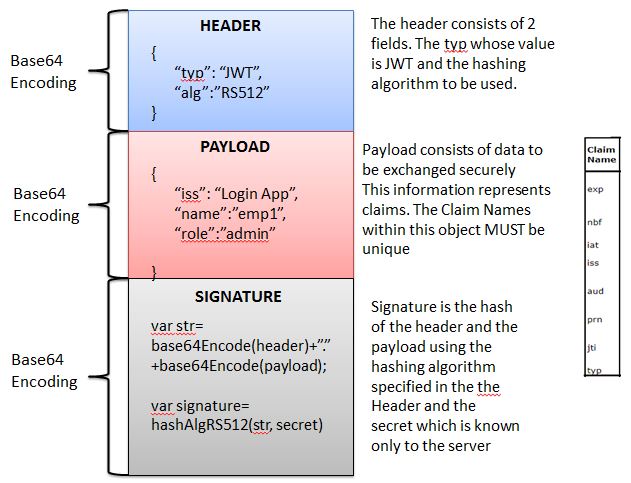
JWT (JSON Web Token) in Java refers to a mechanism used for securely transmitting information between two parties in web applications. It's an open standard that allows for the creation of digital tokens that contain payload data and are digitally signed. These tokens are commonly used for authentication, authorization, and data encryption purposes in web services, APIs, and microservices.
In Java, you can implement JWT using various libraries or frameworks. Some popular options include:
When using JWT in Java, the following process typically occurs:
Token Generation: Your application generates a JSON payload containing the necessary information (e.g., user ID, role, permissions) and digitally signs it using a private key. Token Encoding: The generated token is encoded as a compact, URL-safe JSON string, making it suitable for transmission over networks. Token Transmission: The encoded token is sent to the receiving party, which can be another microservice, API endpoint, or even a frontend application. Token Verification: Upon receiving the token, the recipient verifies its authenticity by checking the digital signature and ensuring the payload matches the expected information.Java implementations of JWT provide various features and benefits, such as:
Stateless Authentication: JWT allows for stateless authentication, as the token contains all necessary information to authenticate a user. Token Revocation: Tokens can be revoked or blacklisted at any time, ensuring that expired or compromised tokens are no longer accepted. Encryption: JWT can be used in conjunction with encryption libraries like OpenSSL or Java's built-in crypto API to encrypt the payload.When choosing a JWT library for your Java project, consider factors such as:
Performance: Look for libraries optimized for performance, especially if you're working with high-traffic applications. Security: Ensure the chosen library provides robust security features and follows best practices for token generation, encryption, and verification. Ease of Use: Select a library with straightforward API usage and minimal configuration requirements to simplify integration.In conclusion, JWT in Java is an efficient and secure mechanism for transmitting sensitive information between parties. By choosing the right library and following proper implementation guidelines, you can ensure your application provides robust authentication, authorization, and data encryption capabilities.
How to use JWT token in Java Spring Boot?
I'm happy to help!
In a Java Spring Boot application, you can use the JSON Web Token (JWT) to authenticate and authorize requests. Here's a step-by-step guide on how to use JWT tokens:
Step 1: Choose a Library
You'll need a library to handle JWT generation, verification, and token parsing. Popular options include:
jwt-simple (SimpleJSON) jjwt (Java JSON Web Token)
For this example, we'll use jjwt.
Step 2: Configure Dependencies
In your pom.xml file (if you're using Maven) or build.gradle file (if you're using Gradle), add the required dependencies:

com.auth0
jjwt
0.9.1
dependencies {
implementation 'com.auth0:jjwt:0.9.1'
}
Step 3: Create a JWT Token
To generate a JWT token, you'll need to create a TokenService class:
@Service
public class TokenService {
private static final String SECRET_KEY = "your-secret-key";
private static final String ISSUER = "your-issuer";
public String generateToken(User user) {
// Create a claims object with the user's information
Claims claims = Jwts.claims().setSubject(user.getUsername())
.setExpiration(Date.from(Instant.now().plus(Duration.ofDays(7))));
// Sign the token with the secret key
String token = Jwts.builder().setClaims(claims).setIssuedAt(new Date()).setExpiration(new Date())
.signWith(SignatureAlgorithm.HS256, SECRET_KEY)
.compact();
return token;
}
}
In this example, we're creating a User object and extracting the username. We're then generating a JWT token with the user's information, expiration date (7 days), and signing it with the secret key using HMAC SHA-256.
Step 4: Verify the JWT Token
To verify the JWT token, create another service class:
@Service
public class TokenVerificationService {
public boolean verifyToken(String token) {
try {
Jws claim = Jwts.parser().setSigningKey(SECRET_KEY).parseClaimsJws(token);
return true;
} catch (Exception e) {
return false;
}
}
}
This service attempts to parse and verify the JWT token using the same secret key. If the token is valid, it returns true; otherwise, it returns false.
Step 5: Integrate with Spring Security
To integrate your JWT token generation and verification with Spring Security, you'll need to create a custom Authentication Provider:
@Configuration
public class WebSecurityConfig extends WebSecurityConfigurerAdapter {
@Autowired
private TokenService tokenService;
@Autowired
private TokenVerificationService tokenVerificationService;
@Override
protected void configure(HttpSecurity http) throws Exception {
// Custom authentication provider for JWT tokens
http.oauth2Login()
.and()
.oauth2AuthorizedGrantTypes("jwt")
.oauth2AuthenticationProvider(new JwtAuthenticationProvider(tokenService, tokenVerificationService));
}
}
In this example, we're creating a custom JwtAuthenticationProvider that uses our TokenService and TokenVerificationService to authenticate and authorize requests.
Step 6: Use JWT Tokens in Your Controllers
Finally, you can use the JWT tokens in your controllers to secure your endpoints:
@RestController
public class MyController {
@Autowired
private TokenVerificationService tokenVerificationService;
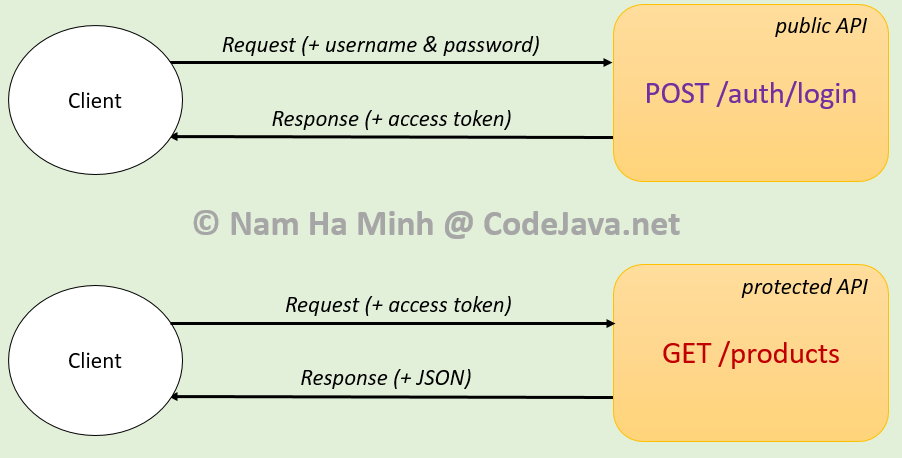
@GetMapping("/protected-endpoint")
public String protectedEndpoint(@RequestHeader("Authorization") String token) {
if (!tokenVerificationService.verifyToken(token)) {
return "Unauthorized";
}
// Authorized, proceed with your logic
}
}
In this example, we're using the @RequestHeader annotation to retrieve the JWT token from the Authorization header. We then verify the token using our custom TokenVerificationService. If the token is valid, we authorize the request and proceed with our logic.
That's it! You've successfully implemented JWT tokens in your Java Spring Boot application.
Remember to handle errors properly, log exceptions, and consider implementing rate limiting or IP blocking to prevent abuse.