Java netty tutorial
Java netty tutorial
Here's a comprehensive Netty tutorial for beginners:
What is Netty?
Netty is a popular, open-source networking framework written in Java. It provides a simple, flexible, and scalable way to build high-performance network applications. Netty allows developers to write TCP/IP clients and servers that can handle various protocols such as HTTP, FTP, SMTP, and many more.
Why Use Netty?
There are several reasons why you might choose to use Netty:
Getting Started with Netty
To get started with Netty, you'll need:
A Java development environment (e.g., Eclipse, IntelliJ IDEA) The Netty library (available from the Maven Central Repository or via Gradle)Here's a simple "Hello World" example to get you started:
import io.netty.bootstrap.ServerBootstrap;import io.netty.channel.ChannelFuture;
import io.netty.channel(ChannelHandlerContext);
import io.netty.handler.codec.string.StringDecoder;
public class HelloServer {
public static void main(String[] args) {
ServerBootstrap bootstrap = new ServerBootstrap();
bootstrap.group(new InetSocketAddress(8080))
.channel(NioSocketChannel.class)
.handler(new ChannelInitializer() {
@Override
protected void init(ChannelHandlerContext ctx) throws Exception {
ctx.pipeline().addLast("decoder", new StringDecoder());
}
})
.childHandler(new ChannelInitializer() {
@Override
protected void init(ChannelHandlerContext ctx) throws Exception {
ctx.writeAndFlush(Unpooled.copiedBuffer("Hello, World!".getBytes()));
}
});
ChannelFuture f = bootstrap.bind().sync();
System.out.println(f.channel().localAddress() + " bound");
}
}
This example sets up a simple TCP server that echoes back the string "Hello, World!" whenever a client connects.
Key Netty Concepts
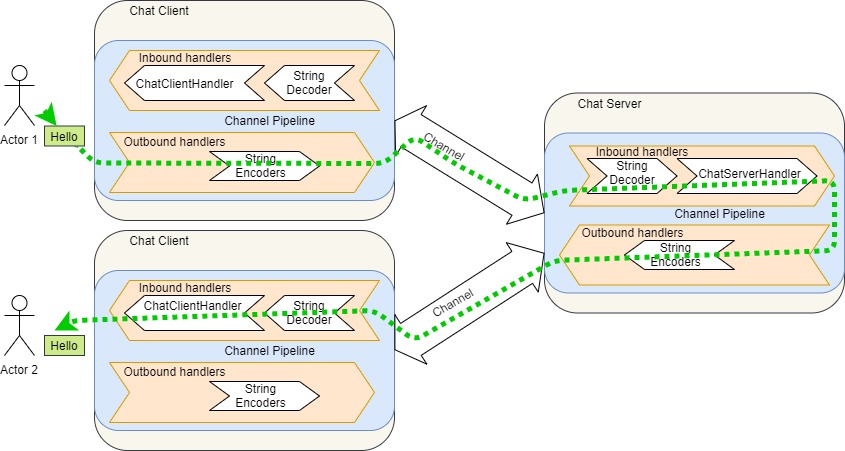
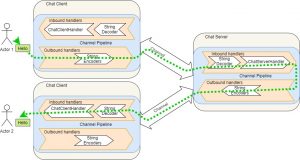
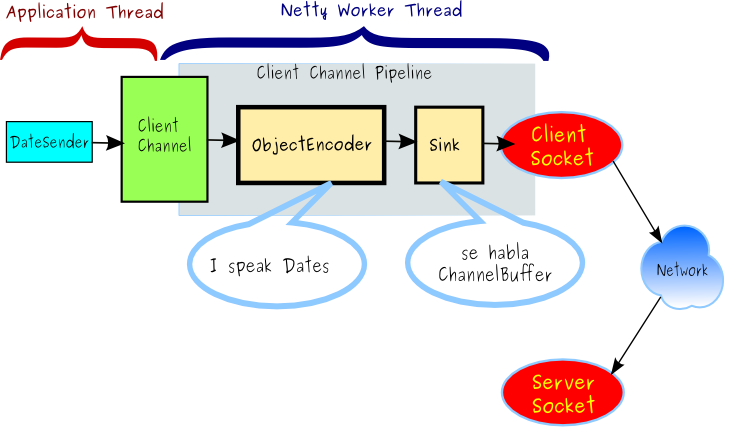
Channels: Represent network connections between clients and servers. Handlers: Process incoming data (e.g., decode, encrypt) or outgoing data (e.g., encode, compress). Pipeline: A series of handlers that are executed in a specific order when data is processed. Events: Trigger handler execution, such as connection establishment, data arrival, or error conditions.Best Practices and Tips
Use the Right Handlers: Choose handlers that suit your application's needs (e.g., StringDecoder for text protocols). Configure Your Pipeline: Order and combine handlers to achieve desired behavior. Test Your Code: Use tools like JUnit or test-driven development to ensure your code works as expected.In this tutorial, we've introduced the basics of Netty and explored a simple "Hello World" example. From here, you can dive deeper into more advanced topics, such as handling multiple clients, implementing custom protocols, or integrating with other Java libraries. Happy coding!
Java netty server
Here is a detailed answer:
Java Netty Server
Netty is a popular open-source framework for building high-performance network applications, such as servers and clients, over the web or other network protocols. It provides an event-driven, non-blocking I/O model to handle client requests efficiently.
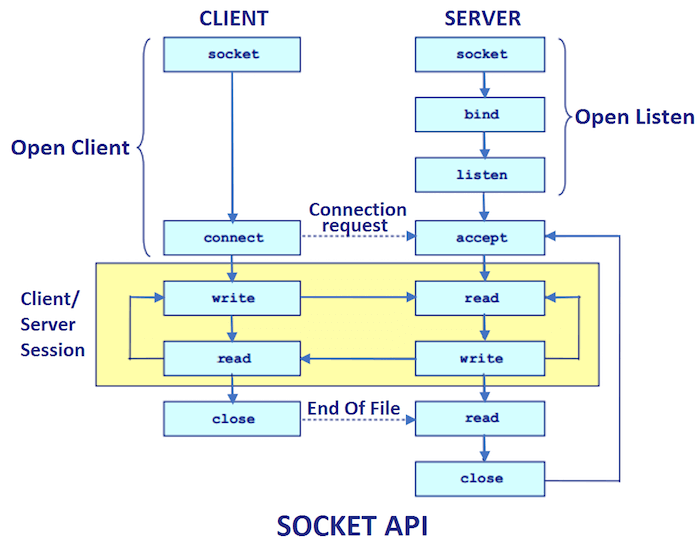
To create a simple Java Netty server using the nio (Non-Blocking I/O) transport, you can follow these steps:
Create a server class: Define a Java class that extendsio.netty
netty-all
4.1.34.Final
dependencies {
implementation 'io.netty:netty-all:4.1.34.Final'
}
ServerBootstrap. This class is responsible for setting up and running the Netty server.
Define the channel initializer: This class is responsible for setting up the channel pipeline.import io.netty.bootstrap.ServerBootstrap;import io.netty.channel.ChannelOption;
import io.netty.channel.nio.NioEventLoopGroup;
import io.netty.handler.logging.LoggingHandler;
public class MyNettyServer {
public static void main(String[] args) throws Exception {
NioEventLoopGroup bossGroup = new NioEventLoopGroup();
NioEventLoopGroup workerGroup = new NioEventLoopGroup();
ServerBootstrap bootstrap = new ServerBootstrap()
.group(bossGroup, workerGroup)
.channel.nio()
.childHandler(new MyChannelInitializer());
int port = 8080; // Choose a free port
bootstrap.bind(port).sync().get(); // Bind to the chosen port
System.out.println("Netty server started on port " + port);
}
}
Implement a server handler: This class processes incoming client requests.import io.netty.channel.ChannelHandlerContext;import io.netty.handler.codec.MessageToMessageDecoder;
public class MyChannelInitializer extends ChannelInitializer {
@Override
public void init(Channel channel) throws Exception {
// Add handlers to the channel pipeline here, e.g.,:
channel.pipeline()
.addLast(new LoggingHandler())
.addLast(new MyServerHandler());
}
}
import io.netty.channel.ChannelHandlerContext;import io.netty.handler.codec.MessageToMessageEncoder;
public class MyServerHandler extends ChannelInboundHandlerAdapter {
@Override
public void channelRead(ChannelHandlerContext ctx, Object msg) throws Exception {
// Process the received message here, e.g.,:
System.out.println("Received request: " + msg);
}
}
Example Output
When a client sends a request to the Netty server, it will print a message indicating that the request has been received.
Remember to handle exceptions properly and close the channels when necessary. This is just a basic example to get you started with building a Java Netty server. You can customize and extend this code to fit your specific needs.
I hope this helps!