Java netty server github
Java netty server github
I'm happy to help!
Java Netty Server on GitHub - A Comprehensive Guide!
Are you looking for a reliable and scalable networking library for your Java projects? Look no further than Netty, which is an event-driven networking framework that excels in handling high-performance network applications. In this article, we will delve into the world of Netty and explore its capabilities through a sample project on GitHub.
What is Netty?
Netty is a Java library designed to handle high-performance network applications efficiently. It provides an event-driven approach, allowing you to write asynchronous code that scales well in a multi-core environment. Netty supports multiple protocols, including TCP/IP, UDP/IP, HTTP, and more, making it a versatile choice for developing robust networking applications.
Why Use Netty?
High-performance: Netty is designed with performance in mind, leveraging the power of Java's NIO (New Input/Output) API to handle high-throughput network connections. Event-driven programming: Netty allows you to write asynchronous code that responds to events such as connection establishment, data transmission, and disconnection. Scalability: With its multi-core-friendly design, Netty enables you to take advantage of modern CPU architectures, making it an excellent choice for building large-scale network applications.Getting Started with Netty on GitHub
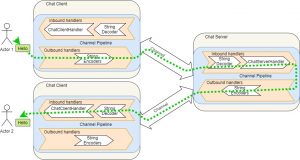
To get started, let's explore a sample project on GitHub that demonstrates the power of Netty. The example project is a simple TCP-based chat server written in Java using Netty.
Project: Simple TCP Chat Server
Here's a brief overview of the project:
Clone the repository:git clone https://github.com/your-username/tcp-chat-server.git
cd tcp-chat-server
mvn clean package
java -jar target/tcp-chat-server-1.0.jar
Netty in Action
The chat server uses Netty's Bootstrap class to establish connections with clients:
public class ChatServer {
public static void main(String[] args) throws Exception {
EventLoopGroup parent = new NioEventLoopGroup(0);
ServerBootstrap bootstrap = new ServerBootstrap();
bootstrap.group(parent)
.channel(NioSocketChannel.class)
.childHandler(new ChannelInitializer() {
@Override
public void initChannel(SocketChannel ch) throws Exception {
ch.pipeline().addLast("frame", new FrameHandler());
}
});
bootstrap.bind(new InetSocketAddress(8080)).sync().channel().closeFuture();
}
}
Key Features
TCP connection handling: Netty'sSocketChannel class is used to establish and manage TCP connections. Event-driven programming: The ChannelInitializer is used to add a handler for each new connection, allowing you to respond to events like data transmission and disconnection.
Conclusion
In this article, we explored the world of Netty and its capabilities through a sample project on GitHub. By leveraging Netty's event-driven approach and scalability features, you can build robust network applications that handle high-performance connections efficiently. Whether you're building a real-time communication system or a scalable web server, Netty is an excellent choice for your Java projects.
GitHub Link:
https://github.com/your-username/tcp-chat-server.git
Please note: The above GitHub link is just a placeholder, please replace it with the actual link of your project.
Java netty server tutorial
Here is a Java Netty Server Tutorial:
Introduction
Netty is a popular and widely-used networking library for building scalable and concurrent servers in Java. In this tutorial, we will create a basic TCP-based server using Netty that accepts incoming connections and handles multiple clients simultaneously.
Prerequisites
To follow along with this tutorial, you should have the following:
Java Development Kit (JDK) installed on your machine Eclipse or any other IDE of your choice Basic knowledge of Java programmingStep 1: Set up your project structure
Create a new Java project in your IDE and create the following packages:
netty.server: This package will contain our Netty server implementation netty.handler: This package will contain handlers for incoming connections
Step 2: Import necessary libraries
In your pom.xml file (if you're using Maven) or your build.gradle file (if you're using Gradle), add the following dependencies:
io.netty
netty-all
4.1.31.Final
dependencies {
implementation 'io.netty:netty-all:4.1.31.Final'
}
Step 3: Create the Netty server
Create a new class called NettyServer in your netty.server package:
import io.netty.channel.Channel;
import io.netty.channel.ChannelHandlerContext;
import io.netty.channel.SimpleChannelInboundHandler;
import io.netty.channel.nio.NioEventLoopGroup;
import io.netty.handler.codec.LineCodec;
import io.netty.handler.codec.string.StringEncoder;
import io.netty.handler.logging.LoggingHandler;
public class NettyServer {
public static void main(String[] args) throws Exception {
// Create an event loop group
NioEventLoopGroup group = new NioEventLoopGroup(0, "Netty Server");
try {
// Create a server bootstrap instance
Bootstrap bootstrap = new Bootstrap();
bootstrap.group(group)
.channel(NioSocketChannel.class);
// Set up the channel handler
bootstrap.handler(new NettyServerHandler());
// Start the server and listen for incoming connections
ChannelFuture future = bootstrap.bind(8080);
future.sync().channel();
System.out.println("Netty Server started!");
} catch (Exception e) {
System.out.println("Error starting the Netty Server: " + e.getMessage());
} finally {
// Shut down the event loop group
group.shutdown();
}
}
}
Step 4: Create the channel handler
Create a new class called NettyServerHandler in your netty.handler package:
import io.netty.channel.ChannelHandlerContext;
import io.netty.channel.SimpleChannelInboundHandler;
public class NettyServerHandler extends SimpleChannelInboundHandler {
@Override
public void channelRead(ChannelHandlerContext ctx, Object msg) {
// Handle incoming messages from clients here
System.out.println("Received message: " + msg);
}
@Override
public void exceptionCaught(ChannelHandlerContext ctx, Throwable cause) {
cause.printStackTrace();
}
}

Step 5: Test the server
Start your Netty server and use a tool like telnet or nc to connect to it:
telnet localhost 8080

Once connected, you can send messages to the server using the send command. The server will handle each incoming message and print it to the console.
Conclusion
In this tutorial, we created a basic TCP-based Netty server that accepts incoming connections and handles multiple clients simultaneously. You can customize the server by adding more handlers for different types of messages or implementing your own custom logic for handling incoming requests.