Which Java version is best for Spark?
Which Java version is best for Spark?
I'm happy to respond in English!
Choosing the right Java version for Apache Spark can be crucial, as it directly impacts performance and compatibility with other components. Here's a breakdown of the most recent versions:
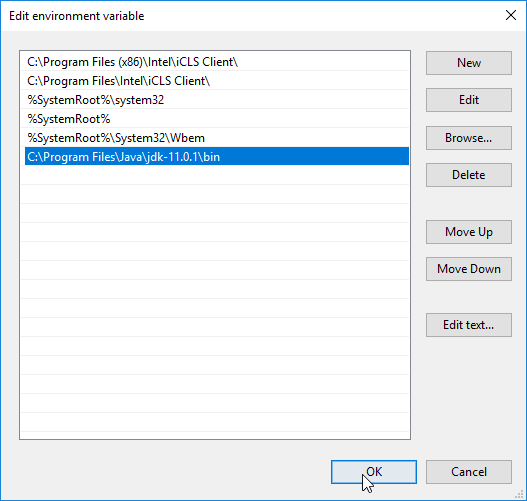
Java 11: Released in September 2018, Java 11 (also known as JDK 11) is a good choice for Spark. It introduced several features that are useful for big data processing, such as:
ZGC garbage collector: Provides low-pause-time garbage collection. Flight Recorder: Enables low-overhead profiling and debugging. JEP 340: Improved performance for hash-based collections.Spark 3.x and later versions support Java 11 or higher. If you're starting a new project, consider using Java 11 as your base.
Java 8: Although officially end-of-life in March 2022, Java 8 is still supported by Spark up to version 2.4.x. However, for new projects, it's recommended to use Java 11 or higher due to the benefits mentioned above.
Java 14 and later versions: As of this writing (March 2023), Java 16 (released in March 2022) is the latest LTS (Long Term Support) version. Spark supports Java 14 or higher, which brings additional improvements:
JEP 359: Improved performance for array-based collections. JEP 365: Enhanced garbage collection and reduced pause times.Keep in mind that using Java 16 might require adjustments to your project's dependencies and configurations, as some libraries may not yet support this version. However, the benefits of using a newer Java version can be substantial.
In summary: For new projects, consider using Java 11 or higher (e.g., Java 16) for better performance, profiling, and debugging capabilities. If you're working on an older project that still uses Spark 2.x, Java 8 should suffice; however, upgrading to Java 11 would provide additional benefits.
Remember that the choice of Java version ultimately depends on your specific use case, compatibility requirements, and personal preferences.
How to deploy Spark Java application?
Deploying a Spark Java application involves several steps that ensure the app is properly packaged and run in a production environment. Here's a step-by-step guide to help you achieve this:
Step 1: Create a JAR file
First, create a JAR file (Java Archive) for your Spark Java application using Maven or Gradle. This will bundle all necessary libraries, classes, and dependencies into a single executable package.
To do this in Maven, add the following plugin to your pom.xml file:
org.apache.maven.plugins
maven-compiler-plugin
3.8.0
1.8
1.8
jar
Then, run the command mvn package to create a JAR file named <your-app-name>.jar.
Step 2: Configure your Spark application
Before deployment, make sure you've properly configured your Spark application. This includes setting up logging, configuring Spark parameters (e.g., spark.app.name, spark.driver.memory, etc.), and adding any necessary dependencies.
You can do this by creating a SparkApplication class that extends JavaSparkApplication. In this class, define the main method where you create and configure your Spark session:
import org.apache.spark.SparkConf;
import org.apache.spark.api.java.JavaSparkApplication;
public class YourSparkApp extends JavaSparkApplication {
public static void main(String[] args) {
// Configure Spark
SparkConf conf = new SparkConf()
.setAppName("Your Spark App")
.setMaster("local[4]")  // Change this to your cluster setup
.setExecutorMemory("1g");
JavaSparkApplication.run(YourSparkApp.class, args);
}
}
Step 3: Package the application with dependencies
Use a tool like Apache Maven Assembly or Gradle's Shade plugin to package your Spark application along with its dependencies. This ensures that all necessary libraries and JAR files are included in the deployment.
In Maven, add the assembly plugin to your pom.xml file:
org.apache.maven.plugins
maven-assembly-plugin
3.1.0
package
single
module
module
Then, run the command mvn assembly:package to create a JAR file that includes your Spark application and its dependencies.
Step 4: Deploy the application
Once you have a packaged JAR file, you can deploy it to various environments, such as:
Local environment: Run the JAR file directly usingjava -jar your-app.jar. Docker container: Create a Docker image with your Spark application and its dependencies. Then, use the docker run command to launch the container. Cloud platform: Deploy your application to cloud platforms like AWS EMR, Google Cloud Dataproc, or Azure HDInsight.
For example, you can deploy your Spark application to an AWS EMR cluster using the spark-submit command:
aws emr add-instance --cluster-id  --instance-type "m4.10xlarge"
aws emr run-job-flow --name "" --jar-file your-app.jar
Step 5: Monitor and maintain
Finally, monitor your application's performance, logs, and resource utilization to ensure it runs smoothly in production. Set up metrics tracking (e.g., Prometheus, Grafana) and use tools like Spark UI or Apache Zeppelin to inspect job progress and error messages.
By following these steps, you can successfully deploy your Spark Java application to various environments and maintain a scalable and efficient data processing pipeline.