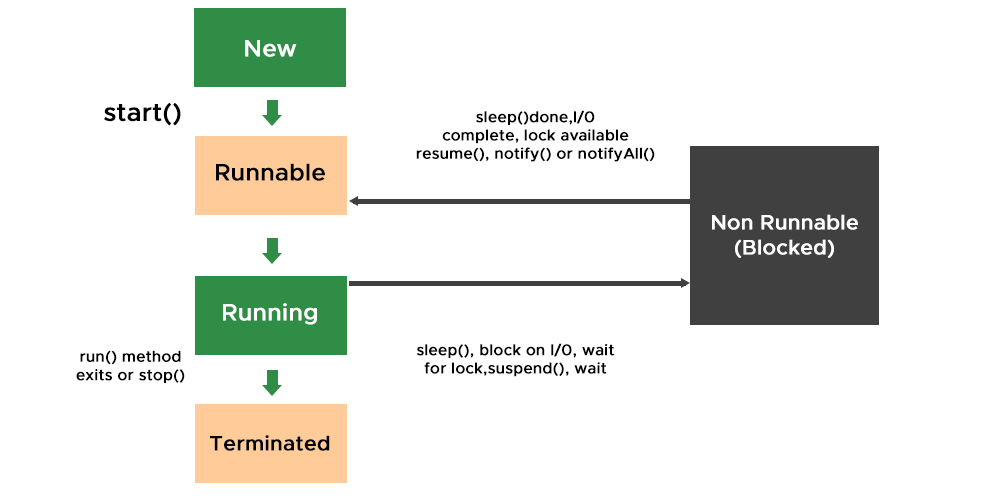
How do I install Java on Windows 10?
How do I install Java on Windows 10?
Here's a step-by-step guide to installing Java on Windows 10:
Prerequisites:
Make sure you have Administrator rights on your computer. Ensure your Windows 10 system is up-to-date.Installing Java Using the Official Oracle Installer:
Download the Java Installer: Go to the official Oracle website (www.oracle.com) and click on "Downloads" (under "Java" or "Oracle Technology Network"). From the drop-down menu, select "Windows 10" as your operating system. Choose Your Installer Type: For a standard installation, choose "Download JDK" (Java Development Kit) or "Download JRE" (Java Runtime Environment), depending on whether you want to develop Java applications or simply run Java-based programs. If you're unsure, start with the JRE, which includes most necessary components. Save the Installer: Choose a location to save the installer file (e.g., your desktop). Make sure to remember where you saved it! Run the Installer: Double-click the installer (.exe) file you just downloaded. Follow the prompts to begin the installation process.Configuring the Installation:
License Agreement: Review and accept the Oracle Software Development Kit (SDK) License Agreement. Installation Location: Choose where to install Java (e.g., "C:Program FilesJava"). Set Your Default Browser: If you want to set your default browser to use Java, select a supported browser from the list (e.g., Google Chrome, Mozilla Firefox). Configure Optional Components: JavaFX: A GUI library for building graphical user interfaces. IcedTea-Web: An optional component that enables certain web-based Java features.Finalizing Installation:
Installation Progress: Monitor the installation progress. Finish the Installation: Once complete, click "Finish" to exit the installer. Update Your Environment Variables (Optional): To use the new Java installation from the command line or IDEs like Eclipse, you might need to update your system environment variables.Verifying the Installation:
Check Your Control Panel: Open the Control Panel and look for "Java" under Programs or Applications. Verify Java Version: Right-click on "Computer" (or "This PC") > Properties > Device Specifications > System Type > Windows 10 (64-bit) > Java Platform Version.That's it! You should now have a successfully installed Java environment on your Windows 10 system.
Download Java for Windows

I'd be happy to help you with that!
Downloading and Installing Java for Windows
Java is a popular programming language that's used by millions of developers worldwide. If you're interested in learning how to program, or if you just need to run Java-based applications on your computer, then downloading and installing Java is the way to go. Here's a step-by-step guide to help you do just that:
Step 1: Go to the Official Oracle Website
First, open up your web browser (like Google Chrome, Mozilla Firefox, or Microsoft Edge) and head over to the official Oracle website at www.oracle.com. Once you're there, click on the "Downloads" tab located near the top of the page.
Step 2: Select Your Operating System
On the Downloads page, you'll see a menu that says "Operating Systems." Click on this menu and select "Windows" (since we're focusing on installing Java for Windows in this example). This will take you to a new page with several options.
Step 3: Choose the Correct Java Version
The Oracle website offers different versions of Java, including JDK (Java Development Kit), JRE (Java Runtime Environment), and SDK (Software Development Kit). For most users, the JRE is sufficient. Click on the "Java SE Runtime Environment" link to download the latest version of Java.
Step 4: Download the Installation File
Once you've selected the correct version of Java, you'll be taken to a page where you can download the installation file. Look for the "Download" button and click on it. This will start downloading the .exe file to your computer.
Step 5: Run the Installer
Once the download is complete, locate the downloaded file (usually in your "Downloads" folder) and double-click on it to run the installer. You may need to accept a user agreement and choose whether to install Java for all users or just yourself.
Step 6: Install Java
The installation process will ask you where you'd like to install Java and what options you want to enable (like setting up a shortcut to your Start menu). Follow the prompts to complete the installation.
Step 7: Verify Your Installation
After the installation is complete, open up your Command Prompt (or Terminal on macOS) and type java -version (without quotes). If everything was installed correctly, you should see a message telling you what version of Java you're running. This verifies that the installation was successful.
That's It!
With these steps, you should now have Java installed on your Windows computer. You can use this to run Java-based applications, like Minecraft or Android Studio (for Android app development). Just remember to keep your Java installation up-to-date by checking for updates regularly!
I hope that helps! If you have any questions or need further assistance, feel free to ask.